So many objects can be made in 3D, mainly with the copper foil technique.
The common objects are regular geometry lampshades and terrariums, but also consider jewelry boxes, specimen cases, candle holders, shelving, free form studies, even coffee tables.
Below is an example of a table. This one is now 25 years old and still going strong.
It is made with 3 vertical panels, braced on the bottom by 3 base panels and the elaborate top is soldered on. This table is effectively a one piece object.
The insect study below is an example of a modest free form 3 dimensional object. It features LED lighting, it's intended use is as a night light. The point is, your imagination and skill are the only limits to your creative expression with this medium..... So learn, practice, test your ideas out, then try it again!
Designing 3 dimensional objects that have regular geometry.
Your usual 3D items are lampshades, pots and terrariums. Designing them accurately can be painful when using maths tables to calculate lengths and angles.
My technique of regular geometric design requires no calculation tables, math's or angle calculations. Please go through the instructions very carefully!! There is a lot to take in and if you miss understanding a step, confusion will set in and you'll not be able to proceed correctly.!!
With this method you can design stained glass of any spherical regular shape providing your drawing is very accurate and done with a sharp pencil..!!!! The object may have any number of panel sides and any number of layers you desire. You'll need A3 paper, a sharp hard pencil, a ruler that measures both centimeters & inches, a T-square, 45 degree set square, protractor and compass.
I usually draw so that one centimeter on the drawing equates to one inch on the finished lampshades!!
This way, the drawing is of good size on A3 paper and easily converts to the larger scale for template creation.
Prepare a clean sheet of A3 paper by orientated to landscape & tape it down squarely onto a GOOD SQUARE EDGED DRAWING BOARD.
On the upper left corner of your paper, design your lampshades Start by drawing a side elevation of the design's profile.
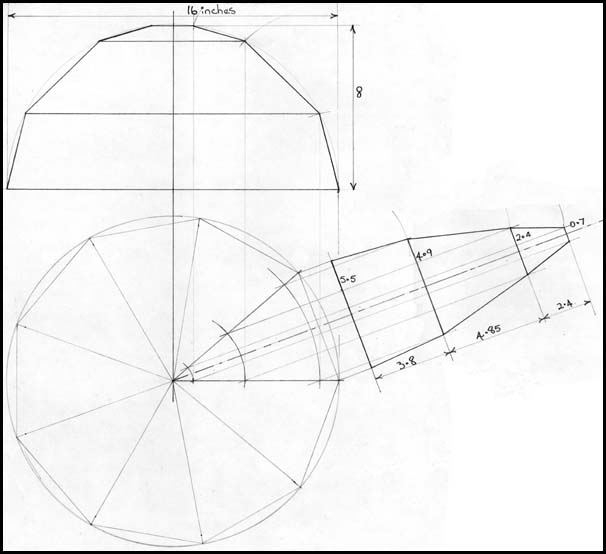
Illustrated here is a 3 layered lampshades that will have 9 sides. It's overall dimensions are 16 by 8 inches. Keep in mind that you are drawing it in centimeters, this is so that your drawing fits onto your A3 paper.....
Now below this design drawing, draw in a circle. It must be the same diameter and be aligned with the side elevation drawing. Now draw in a radius line from the circle's centre to the right hand edge of the plan drawing.
Choose the number of sides you wish the lampshades to have (in this example we are going to have 9 sides so it's 360 divided by 9 = 40 degrees) and draw in the radial lines that divides the circle into 9 sections.
Draw vertical lines from the side elevation down to the horizontal line on the right side of the plan drawing. Then with a compass, draw arc's that intersect this horizontal to the next section above.
Now you'll need to draw in an angle bisection into the working section.
Next draw parallel lines to the bisection line you've just drawn from each of the intersections you'll find on the working section. These lines define the widths for your template.
Observe closely what is seen here and you will understand how this gives the widths you require for each template.
Next, draw in a line perpendicular (right angle) to these parallel lines. Have this new line join the widest pair of parallel lines.
Now with your compass, measure the length of the largest layer edge and mark this length so that it intersects the next smallest parallel line.
Now draw in another square line on far end intersect cross. This line closes this new shape.
Duplicate this action until all of the shapes are drawn in and defined.
Lastly, measure accurately with a ruler the lengths and widths you now have for each template shape. Measure as centimeters but create the templates in inches. These shapes are then drawn with precision onto a light cardboard then cut out to create your finial templates for marking the stained glass with.
Below is the finished tech. drawing of my method.
Providing you draw and measure with total accuracy and your templates are also made with great care, this technique will enable you to design any regular geometric stained glass object you wish to build.
Now you've read through the procedure, it'll be helpful to watch my Youtube video of it. I strongly suggest that you have a go at it yourself a few times until you feel confident with each step. Remember to draw on an A3 sheet of paper, draw with centimeters and scale the templates to inches.
Now we've got our dimensions for the lamp shade sorted, we can make the templates.... :-)
They need to be extremely accurate! If they are not you'll run into endless trouble when you assemble the glass into 3D. So, take your time drawing them up and cutting them out... Double check your work as you go and you'll avoid disappointment later in the construction.
Begin template creation by taking a sheet of card paper and taping it down (orientated landscape) onto your drawing board.
Draw a horizontal line using your T-square and sharp pencil across the centre of the card paper.
Now draw a vertical line on the left hand end of the paper that intersects your horizontal line.
With your dimensions drawing handy, take the widest width measurement (5.5) and halve it. i.e. 2.25. With your compass, open it against your ruler to this measurement 2.25 inches exactly.
Now position the compass point on the intersect point you've just made. Scribe the compass length carefully top and bottom onto the vertical line.
Now, note the first horizontal length (3.8). Use your ruler and mark the horizontal line with 3.8 inches.
On the new mark, use the T-square and set square to accurately mark the next vertical line.
Note the next measurement (4.9), divide by 2. Open your compass against the ruler to 2.45 inches. Position the compass point on the intersect point you've just made. Scribe the compass length carefully top and bottom onto the vertical line.
OK, repeat these steps until you reach the end of your measurements at 0.7.
Join up all the marks you've made on the vertical lines. You've now drawn your templates, time to double check this drawing by going over all the measurements with the ruler. If any of them are wrong, you'll need to make corrections. GET IT PERFECT! TO AVOID DISAPOINTMENT LATER!!
Now, with a sharp hobby knife (NEVER USE SCISSORS) and ruler, (preferably a steel one) cut the templates from the sheet of card paper then number them.
Finally, check each template for perfect symmetry. Place it onto paper and draw around it with a sharp pencil. Turn the template over and line it up to the pencil marking. If the pencil mark shows up perfectly around the template, you've got it right. Any misalignment is not acceptable. START OVER!
Remember to make an envolope to store your design and templates in. A lot of effort goes into these.
Take time enough to look after your work,.... yes?
As a beginner, following my method maybe too difficult for you. You just wish to get straight into building your first lamp without the headache of working out the template dimensions..... fair enough.
There are many books available that provide patterns for beginners to advanced artists to tackle.
My main suggestion when using pattern books is to photocopy the pattern from your book onto card paper. Generally speaking, take 2 copies, one as your layout sheet and the second is cut into accurate templates.